
With pfSense and Omada
I’ve written a lot about my experiences with VLANS. They have become a key part of my 2021 Home Network set up and are critical to allowing me to work with Malware responsibly. However, despite utilizing VLANs heavily I haven’t actually taken any time to explain VLANs and how to set them up. So today I’m going to fix that.
What are VLANs?
VLANs, or Virtual LANs, are a logical grouping of devices in the same physical domain. A VLAN breaks a single physical domain into multiple broadcast domains. This is an important distinction to understand. The physical domain encompasses everything plugged into and behind (logically) the gateway device. Let’s us a pretend business network for a minute here:

In this network we have several different sections of the company. Currently all of these different sections are on one broadcast domain, meaning that a broadcast packet from any of them will reach everyone. This also means that any member of this network could reach out to any other member, your HR department could reach your R&D department.
This creates two major problems. First it’s a security nightmare because everyone can reach everything (assuming there’s no additional controls like ACLs on shared drives). Secondly this becomes a major headache for the IT folks when it comes to management. Since there are no VLANs there’s probably not a logical grouping of IPs for different devices. 192.168.1.30 might be an R&D machine and 192.168.1.31 might be an HR machine. This becomes difficult to work with and manage as you could have devices assigned all over the place on your network.
This is where VLANs come into play. VLANs allow the IT team to split their network into logical chunks and place everyone on their own chunk of the network.
VLANs are NOT a security tool…technically
Whenever I say this it usually causes some heads to spin, but I stand by the statement. When you read the Original IEEE802.1Q 2005 Draft 0 publication and RFC2674 it becomes pretty clear that VLANs were developed as a management tool with security considerations being relegated to a small paragraph. Never-the-less the security community has been able to use VLANs with such great effect that people now largely consider VLANs as a security and privacy tool.
I’m going to show how we can use this for both grouping and from a security perspective.
Key Terms
When we’re working with VLANs there are some key concepts that go by different terms depending on what type of switch you’re using. I’m going to list them as I learned then, and describe them, but if they don’t line up directly with your switch then go with the concepts. Untagged
UNTAGGED
Untagged is a tricky term because most people hear it and think that it means no VLAN tag or ‘not part of the VLAN’. While I understand the confusion there untagged actually doesn’t mean that. Untagged essentially means remove the VLAN tag and treat the device off this port as if it’s part of this VLAN.
Essentially what this means could better be read as “the computer plugged in here is part of this specific VLAN”. You can pass multiple VLANs across the same physical Ethernet wire but the device will take an IP in the Subnet of that specific VLAN.
This concept of untagged ports becomes incredibly important when we are trying to pass VLAN tags between multiple switches, which we’ll get to in a little bit.
TAGGED
Tagged ports will not take the IP of the VLANs marked as tagged. Instead they will take the VLAN packets and pass them further down to the next device in line.
NON-MEMBER
Non-Member is pretty straight forward. A Non-Member port does not accept the VLAN tag. This is very important for making sure that devices on specific VLANs aren’t able to contact other VLANs.
Setting up a VLAN
This next section will be pfSense and Omada specific as that’s the equipment I have, but the policy of 802.1Q is the same across devices.
In pfSense go to interfaces -> Assignments ->VLANs

Click add and fill out the information
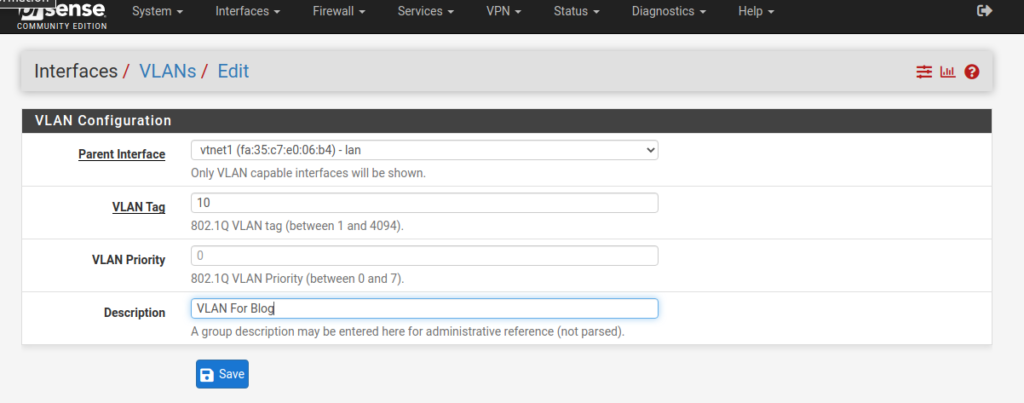
You need to specify what interface you want the VLANs to be associate with and pick a number. In general the parent interface is probably going to be your LAN. Think of this parent interface as the same interface that you plug the LAN cable into.
Go back to the Interfaces -> Assignments tab and look for your new VLAN in the drop down. Hit add

Click on the name of this new interface to go to it’s management page.

You will need to make three modifications here.
- Check Enable Interface
- Set IPv4 Configuration Type to Static (or IPv6 if you prefer that)
- Set an IPv4 address and CIDR
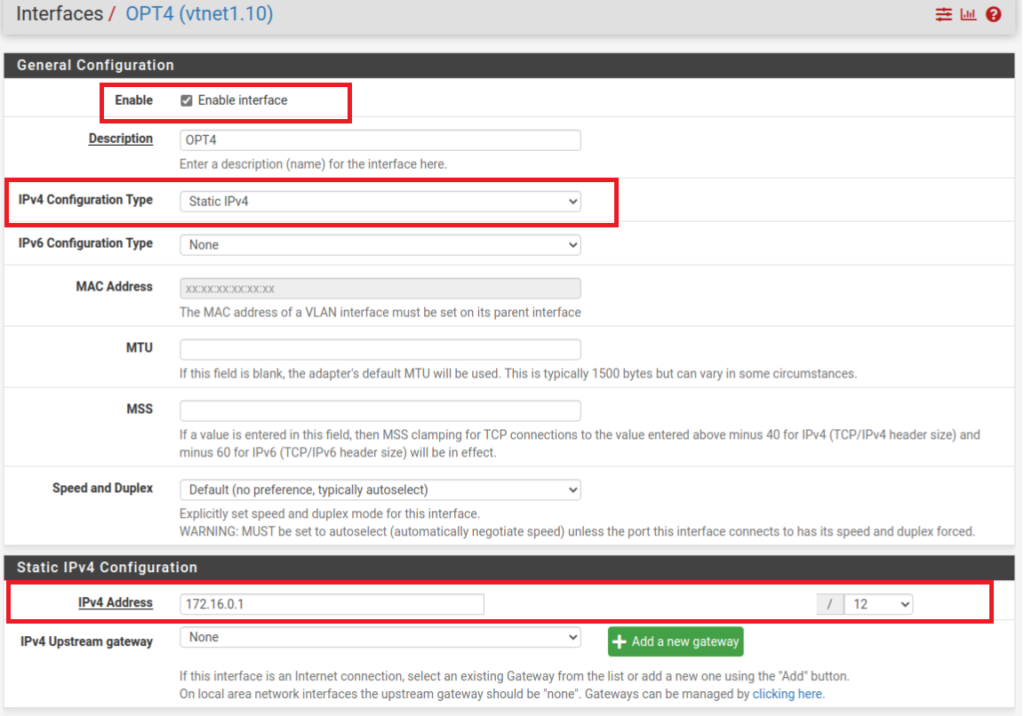
The IPv4 Address can be whatever you want inside of the RFC1918 IP ranges. Same with the CIDR. I chose 172.16.0.0/12 as an example but you can choose whatever you want. On my home network I associate the VLAN tag with the 3rd octet of the address. VLAN 10 = 192.168.10.1/24, VLAN 20 = 192.168.20.1./24, etc. This helps we remember the ranges of IPs with their associated VLAN tags.
Hit save and then apply changes.
Setting up DHCP server
Next go to Services -> DHCP Server -> [VLAN Name]
Here you’ll need to modify two settings.
- Enable the DHCP server
- Set the Range of Available addresses
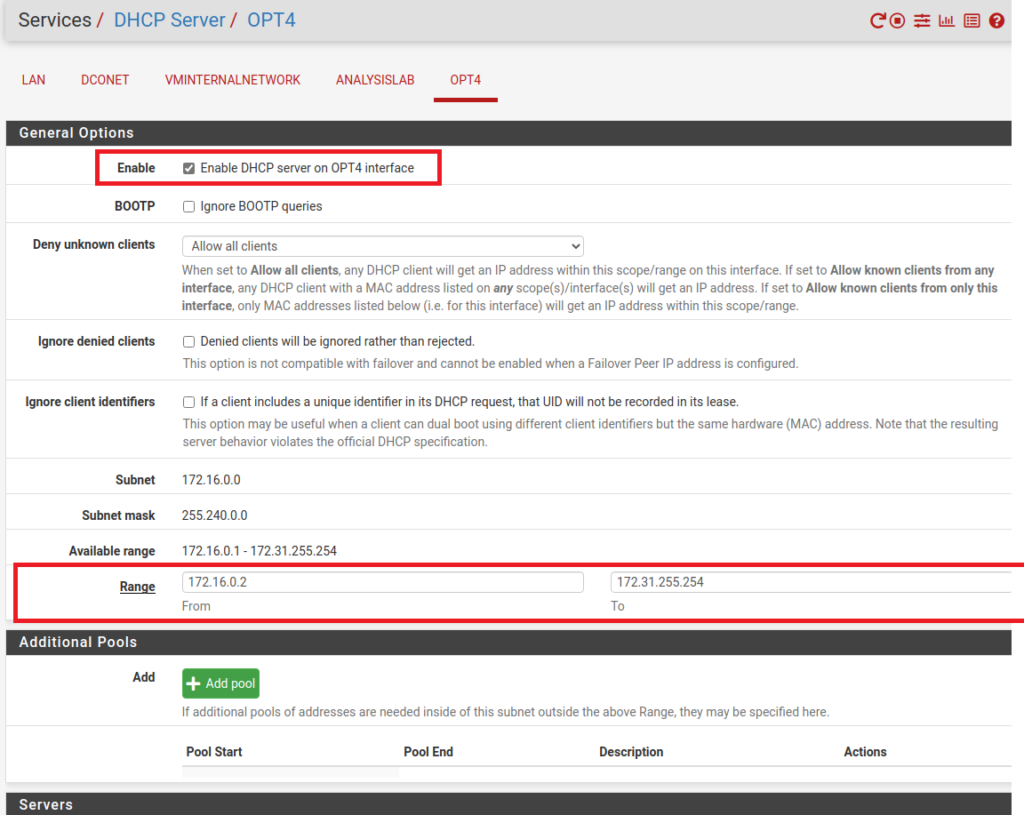
Save the changes.
Securing the VLAN
Before we get into allowing access we need to make sure we’re properly securing our VLANs so they can’t access other networks.
Make an Alias
We’re going to create an alias for RFC1918 networks to block access between VLANs
Go to Firewall -> Aliases -> add.
Add the RFC1918 IP ranges
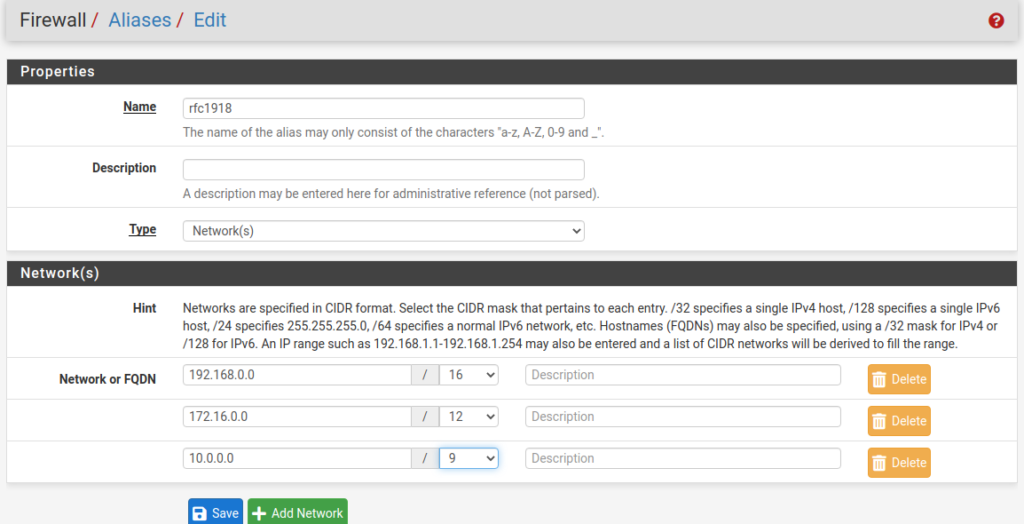
Save and apply changes.
Set up the Firewall Rules
Go to Firewall -> Rules -> [VLAN Name]
We’re going to make a few rules here to allow access to the internet but prevent this network from reaching our other networks.
Your rules should look like this:
- Pass TCP/UDP VLAN Net * This Firewall 53 (DNS) *
- Pass TCP/UDP VLAN Net * This Firewall 67 * [DHCP]
- Pass TCP/UDP VLAN Net * This Firewall 123 (NTP) * [If Required]
- Block * VLAN Net * This Firewall * *
- Block * VLAN Net * RFC1918 [Alias] * *
- Pass * VLAN Net * * * *

These Firewall rules will allow clients on your VLAN to reach the internet but not allow them to reach any other subnets on your network.
Configuring the Switch
Login to your switch’s admin page and find the 802.1Q VLAN section. Put your VLAN ID (the number you created earlier) in and assign the ports to either Untagged, Tagged, or Not Member.

Setting up the Wireless
This next section assumes you have a wireless router that supports VLANs of SSIDs. If you want my thoughts on VLAN capable devices read this blog. If you don’t have a VLAN capable access point then you can check out this post on how I set up my house before I had these devices.
Login to your AP point controller, or AP directly, and make a new SSID. Mark that SSID with the same VLAN tag as you created in the pfSense and that you marked as Tagged in the switch.
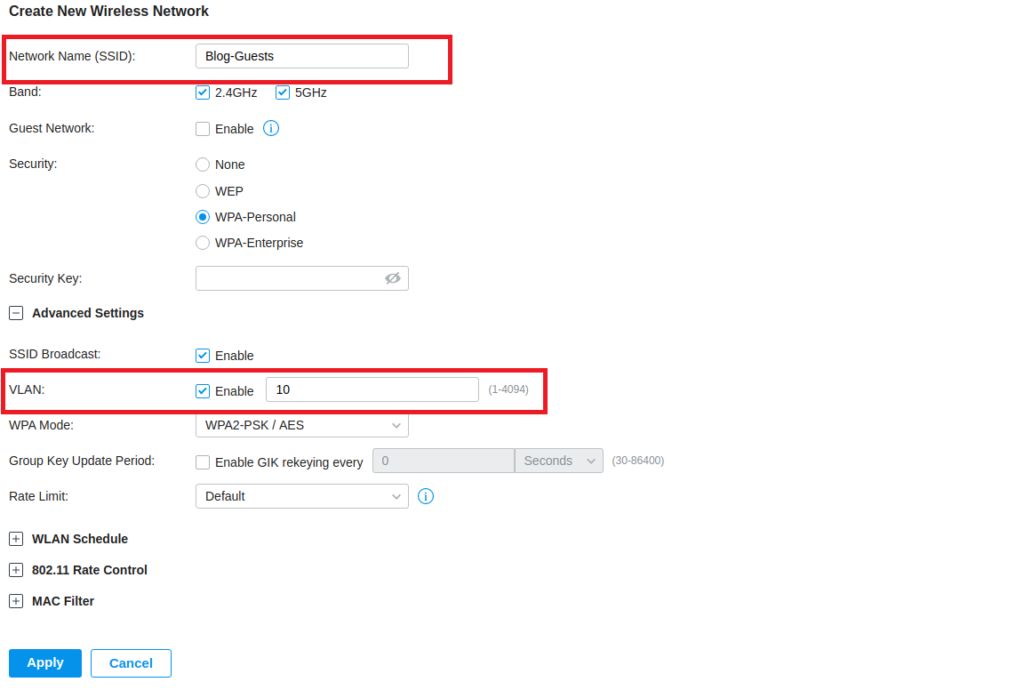
Apply this and congratulations you now have a VLAN set up and secured. You should be able to now login to the new SSID and get placed on the VLAN you created.

