
Background
A little over a year ago I wrote a blog post taking a retrospective look at my home network. It was pretty fun to see how I’ve grown as a Cyber Security professional but it also showed me that I still had a lot to do in order to make my network more secure.
Over the last 6 years that I’ve been married my wife has tried to be supportive of my tech obsession. In her efforts to be supportive she bought me a lot of different IoT devices, from several different companies. Ever the pragmatist my wife would grab IoT devices when they went on sale unknowingly creating a nightmare for me. Since she was buying devices based on price and not based on brand standardization I now have a hodgepodge of different IoT stuff in my house. I was to be clear about this; I’m not trying to bash on my Wife. She had the best of intentions, but they say the road to hell is paved with the best of intentions. That might be dramatic for this situation, but the concept is not; users will often times cause nightmare for us even though they’re only trying to be helpful.
In her attempts to be supportive my wife unintentionally created a security and configuration nightmare for me. I now had several different apps on my phone; each managing only a single device, sometimes two. In addition to that a lot of these devices were from relatively unknown companies and haven’t been updated in years or were never updated after they left the factory. There’s no shortage of news articles about IoT devices getting owned because of default passwords, insecure configurations, etc. I decided it was time to finally do something.
The Solution
A few months ago I bought some hardware to build a pfSense router to place as my edge router and replace my Mikrotik RB3011. I’ll cover this in more depth when I do a blog on my updated network diagram. As the title of this article says I’ll be using VLANS for this, but first;
The Requirements:
I’ve said this before but every good re-engineering project should always start with a set of requirements. Requirements help us ensure that we’re doing the things that need to be done. So for this projects I had a few requirements:
- IoT and Guest Networks must be separated from the main home net:
- This could be logical or physical
- I can’t run additional cables through the house:
- I have one cable going from my basement and one cable running to my upstairs. Adding additional cables would be too cost prohibitive
- All IoT devices must still work with Google Home:
- There needs to be minimal downtime:
- My house is heavily reliant on the internet for pretty much everything.
- No heavy costs:
Working through the solution:
As I went through these requirements I started brainstorming possible ideas. My pfSense router has 5 ports on it (not counting the WAN) so my initial thought was to simply connect another router to the LAN2 port and make a different subnet. That’s what I’ve done with my Mikrotik before, but that was all stuff located in the basement with me. Unfortunately that solution wouldn’t work here. My house is 3 stories (basement + 2 floors) and the router in the basement doesn’t reach the 2nd floor. So that means IoT devices on the top floor won’t connect to a router in the basement.
I needed a way to create the Guest/IoT mesh in a way that it reached the top floor. I’ve dealt with this before with Google Wi-Fi and unfortunately using a wireless backhaul is not powerful for my house.
If a wireless backhaul is not an option then the only option is a wired backhaul, but I had a requirement that I couldn’t run more cables. This meant that I need to get two LANs going across one LAN cable, and what technology allows us to place two LANs on one LAN cable? 802.1Q VLANs.
Planning the VLANs
VLANs have been something I’ve wanted to get into for a while but I’ve never had much of a reason to really look into them; sounds like I have a reason now.
After several hours of research on how to set up VLANs I felt prepared to begin but I knew that this was going to require some major reworking. I also knew that if I went in blind I was going to screw this all up (spoiler alert: I screwed up, but thankfully not bad).

I went to my whiteboard and started drawing it out so I could reference back to it later. After that I took my crude whiteboard drawing and recreated it on draw.io.
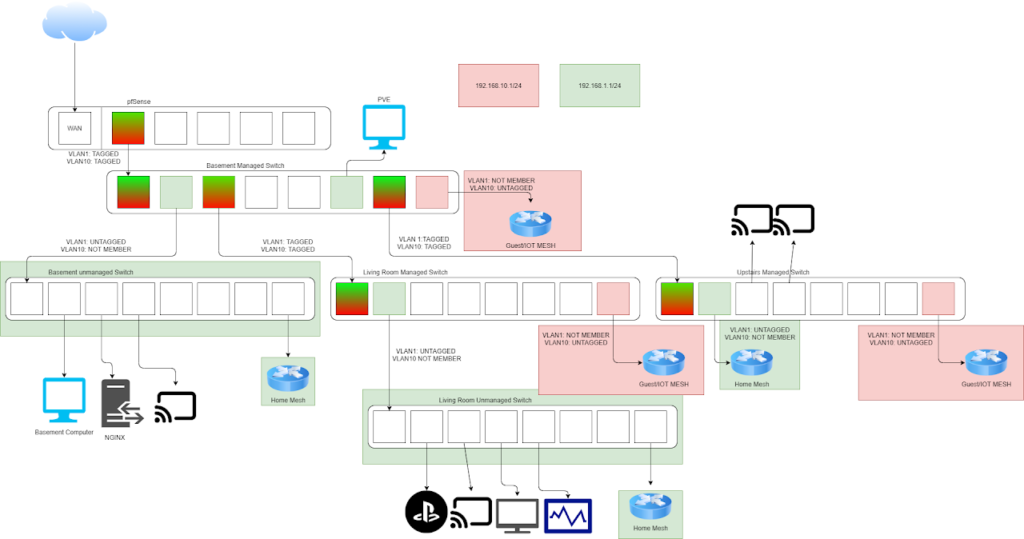
This was my first time planning out a network with proper VLANs so I had to consult some other Cyber Security Friends to make sure this works the way I was expecting. This layout did work how I wanted, I simply didn’t set it up right at first.
Maintenance Time:
I talked with the wife and scheduled some network downtime for after the kids went to bed and got started.
I’ll be direct here; I’ve never truly appreciated the difficulty of actually building a network out that supports VLANs. This was substantially more difficult than I expected it to be, and I need to give some post-due kudos to the network and server admins who have to physically install and configure devices like this regularly.
There’s not much to say here. The whole setup took me an hour and a half to take everything out of my server rank, hook up the new switches, and power everything back up.
Mistakes I made:
- The first mistake I made was connecting the switch to the wrong port on the pfSense.
- On my pfSense I had LAN1 and LAN2 set up. LAN2 was a training network with a captive portal set up. Since my Wi-Fi router is connected to the the switch as soon as the switch connected to the router it started to pull the DHCP range of a network with a captive portal. This caused a bunch of devices without a web browser to refuse to connect to the network.
- I was rushing to get the Wi-Fi back online for my Wife and Kids. In my haste I connected things wrong and that lead to an even longer delay as I had to wait for DHCP leases to expire or go through the house unplugging and plugging devices back in.
- The second mistake I made was not connecting the Living Room managed switch to the basement managed switch.
- This caused the Wi-Fi in my living room to not reconnect and caused issues for my Wife and kids (in fairness I did put this maintenance on the schedule).
- The last mistake I made was that I didn’t mark port 1 as a tagged port for VLAN10 traffic.
- This caused issues with devices getting proper addresses from the IoT interface DHCP server.
- Port 1 was marked as untagged so when VLAN10 traffic reached that port it was stripped off and thus the IoT Wi-Fi was getting an IP addresses associated with the normal LAN network.
Things I learned:
- VLANs allow us to split a single network interface into multiple subnets, where normally each network interface has a single subnet.
- Before this I didn’t fully understand the need for VLANs as opposed to simply creating multiple subnets. I thought VLANs were a tag that separated traffic on the same subnet.
- VLANs don’t provide inherent security
- I learned that I need to create firewall rules to separate the IoT subnet from the LAN subnet.
- I made a technical diagram at a tactical level to specifically plan out what ports would be what VLANs tags would be applied to each port.
- I learned how to configure VLAN tags on a managed switch.
Conclusion:
I had a ton of fun setting up this network. From the research, to planning, to actually setting this all up it was a blast and I learned a ton doing this.
I really like doing projects like this because it gives me the opportunity to flex some skills I haven’t used in a while, and learn some new things. Because of this project I’ve learned so much more about VLANs.
Now it seems like I need to update my network diagram again.